Annotating
The editor gives you a full annotation toolkit over your image. Each drawn annotation is rendered in its own layer, separate from the image, and can be freely re-selected, moved, and modified.
Tools

| Rectangle / Oval | Drag to draw; hold Shift to constrain to a square. Stroke and fill are independent (either can be transparent), with optional rounded corners. |
| Arrow | Drag to place; hold Shift to snap to 45° angles. To edit an arrow in Select mode, drag either endpoint to reposition, or move the curve handles to bend its line. Endpoints can attach to another annotation — drag an endpoint over it and drop it onto one of its highlighted handles — it then follows if that annotation is moved or resized; Right-click → Unbind to detach. |
| Draw | Two modes in one tool: drag to paint a freehand brush stroke, or click to drop connected points and build a multi-segment line — each click adds a vertex, Esc / Return (or a double-click ends it), Delete removes the last vertex. In either mode, hold Shift to snap to 45° angles. Supports dotted / dashed line styles. |
| Text | Drag a box and type; double-click to re-edit. Boxes can carry a border and a background fill — or neither, for bare text — and can be freely resized afterward in Select mode. |
| Image overlay | Paste an image from the clipboard (⌘V in Select mode), or right-click empty canvas → Add image overlay… to pick a file. Move and resize like any shape (Shift keeps proportions); the opacity control applies. |
Editing in Select mode
Select any annotation to restyle it, resize it (via its handles), or to move it (you can nudge it more finely using the arrow keys).
Shift while moving locks direction to horizontal / vertical. Hold Shift while nudging selections to move them 10px at a time. See Shortcuts for the full list.
Selecting multiple
Drag a marquee over empty canvas to lasso a group of annotations or Shift-click annotations to add them to the selection (Shift-click again to cycle through overlapping items, or to deselect).
- Toolbar and right-click operations apply to the whole selection at once — and they’re tool-aware, so e.g. an arrowhead change only touches the arrows in a mixed selection while leaving text and shapes untouched.
- Move the group together, or align their edges (see below).
- Press +/- to grow / shrink the selection — font size for text, line width for shapes, arrows, and freehand.
- Press 1–8 to color the whole selection from your favorite palette (⇧ for fill / background).
Style & presets
By default, each annotation tool remembers its last-used style (stroke color, fill color, opacity, line width, pattern, corner radius, text properties) — controlled by Remember last style for each tool in Settings; with it off, current toolbar styles carry between tools.
In addition, you can save frequently used styles as presets — right-click a selected annotation to save or apply one (or use the chevron on a tool’s button). The limit is 5 most recent presets per tool.
Right-click menu
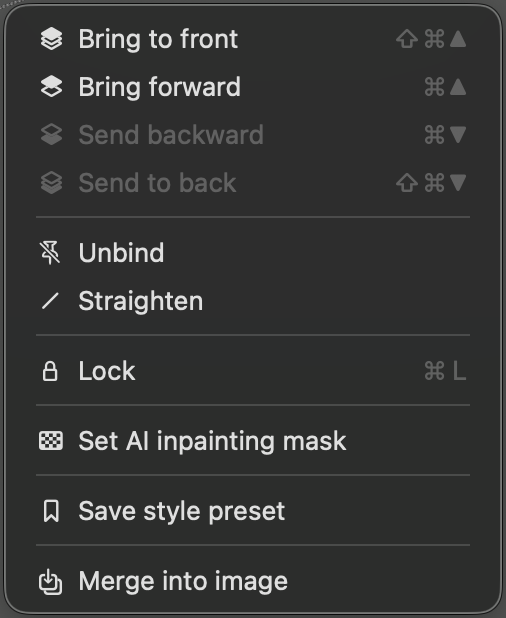
Right-click on a selection for:
| Layer order | Reorganize how your overlapping annotations stack on top of each other. |
| Align | Automatically align all items in your multi-selection, to the selection’s outermost edge or the midpoint. |
| Straighten | Arrows only — flattens a curved arrow back to a straight line. |
| Unbind | Arrows only — detaches endpoints attached to another annotation. Shown only when the selection has an attached endpoint. |
| Lock / Unlock | Locked items stay selectable but resist move, resize, and nudge. |
| Set / Clear AI inpainting mask | Marks the selection as the permitted edit region for an AI image edit — see AI inpainting masks. |
| Save / apply style preset | Store current tool style for future recall — see above. |
| Merge into image | Permanently “bakes” the annotation(s) into the picture. |
Everything is undoable with ⌘Z.
Visibility toggles
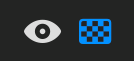
Two buttons at the footer’s left edge control which layers you see — and, in turn, which ones an AI request receives. What you see is what gets sent.
Annotations toggle
The eye hides the entire annotation layer:
- Exports and Copy produce the bare image while hidden — easily save a clean version without deleting your annotations.
- AI requests normally send your visible annotations to the model as a separate layer, plus a text transcription of them; while hidden, only the image and your prompt are sent.
- Annotation tools and editing are disabled until you toggle the layer back on.
- Disabled when the canvas has no annotations.
Masks toggle
The checkerboard shows the inpainting mask layer — a red tint over areas outside of your masks, not to be touched by AI models:
- Switches on automatically once at least one annotation is marked as a mask (right-click → Set AI inpainting mask).
- AI requests include the mask only when this toggle is on, independently of the eye toggle — you can hide all annotations and still send the mask.
- Mask shapes also carry through the normal annotation layer, so a masked shape still reads as markup — see AI inpainting masks.